Introduction
Building a full-stack web application can be thrilling, but if you’re new to the MERN stack, one of the biggest hurdles is figuring out how to connect frontend with backend in MERN stack. You’ve got your sleek React interface on one side and your robust Node.js server with Express and MongoDB on the other—but how do they communicate seamlessly?
As a developer who’s been through this myself, I remember staring at error messages, wondering why my React app couldn’t fetch data from the backend. The good news? It’s simpler than it seems. In this comprehensive guide, we’ll walk through the process step by step, using tools like Axios or the Fetch API. We’ll cover setup, API calls, handling errors (like those pesky CORS issues), and even deployment tips.
By the end, you’ll have a working MERN project where your frontend talks effortlessly to the backend. Whether you’re building a simple blog or a complex e-commerce site, mastering this connection is key to unlocking the full potential of MERN stack development. Let’s dive in!
🔗 What is MERN Stack? A Quick Overview
Before we jump into the connection process, let’s ensure we’re on the same page about what the MERN stack actually is. MERN is a popular JavaScript-based tech stack for creating modern web applications. It stands for:
- MongoDB: A flexible NoSQL database that stores data in JSON-like documents, making it perfect for handling dynamic data without rigid schemas.
- Express.js: A lightweight web framework for Node.js that simplifies building APIs and handling HTTP requests.
- React.js: A powerful library for crafting interactive user interfaces with reusable components.
- Node.js: The runtime environment that lets you run JavaScript on the server side, enabling full-stack development in one language.
What makes MERN so appealing? It’s all JavaScript, which means you can switch between frontend and backend without context-switching languages. This stack powers everything from social media apps to real-time dashboards. If you’re wondering how to connect frontend with backend in MERN stack, it all boils down to APIs—your backend exposes endpoints, and your frontend consumes them.
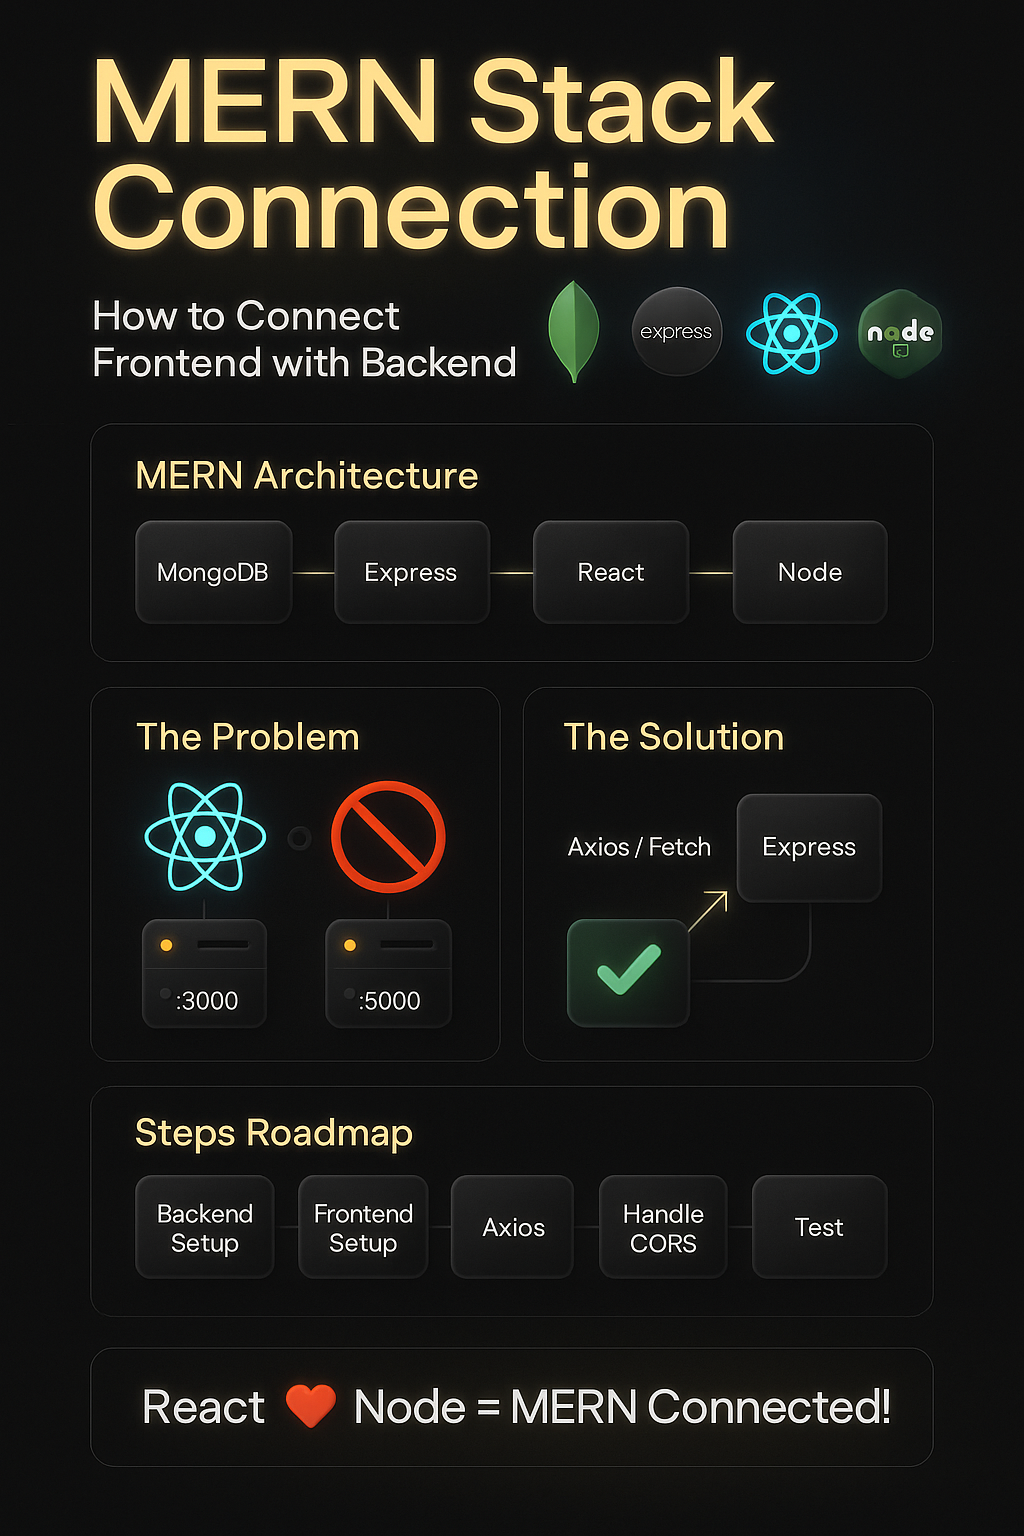
⚡ The Challenge: Why Connecting Frontend and Backend Isn’t Straightforward
In a MERN project, your React frontend typically runs on http://localhost:3000 (thanks to Create React App), while the Node/Express backend spins up on something like http://localhost:5000. They’re like two islands separated by a digital ocean—different ports mean they’re treated as different origins by browsers.
Attempt to make a request from React to your backend, and boom: you hit the wall known as Cross-Origin Resource Sharing (CORS). You’ll see errors like:
Access to XMLHttpRequest at 'http://localhost:5000/api/data' from origin 'http://localhost:3000' has been blocked by CORS policy: No 'Access-Control-Allow-Origin' header is present on the server.This security feature prevents unauthorized cross-site requests, but it can frustrate beginners. Other common issues include mismatched URLs, unhandled errors, or even forgetting to start one of the servers. Don’t worry—we’ll tackle these head-on in our guide to connect frontend with backend in MERN stack.
Step-by-Step Guide to Connect Frontend with Backend in MERN Stack
Ready to get hands-on? We’ll build a simple app where the frontend fetches a message from the backend. Assume you have Node.js installed and basic knowledge of MERN components. If not, start with official docs for quick setups.
1. Setting Up the Backend with Node.js and Express
First, create your backend folder and initialize a Node project:
mkdir backend
cd backend
npm init -y
npm install express cors mongoose # Mongoose for MongoDB integration, if neededNow, create index.js for your server:
// backend/index.js
const express = require('express');
const cors = require('cors');
const app = express();
const port = 5000;

// Enable CORS for all routes (we'll refine this later)
app.use(cors());

// Parse JSON bodies
app.use(express.json());

// A simple GET endpoint
app.get('/api/message', (req, res) => {
  res.json({ message: 'Hello from the MERN Backend! This is your connected data.' });
});

// For MongoDB integration (optional for now)
const mongoose = require('mongoose');
mongoose.connect('mongodb://localhost:27017/mernDB', { useNewUrlParser: true, useUnifiedTopology: true })
  .then(() => console.log('MongoDB connected'))
  .catch(err => console.error('MongoDB connection error:', err));

// Start the server
app.listen(port, () => {
  console.log(`Backend server running on http://localhost:${port}`);
});This sets up a basic API. Run it with node index.js. Test it by visiting http://localhost:5000/api/message in your browser—you should see the JSON response.
2. Setting Up the Frontend with React
Now, for the frontend. Create a React app if you haven’t:
npx create-react-app frontend
cd frontend
npm install axios # For easier API callsIn src/App.js, add code to fetch data from the backend:
// frontend/src/App.js
import React, { useEffect, useState } from 'react';
import axios from 'axios';

function App() {
  const [message, setMessage] = useState('Loading...');
  const [error, setError] = useState(null);

  useEffect(() => {
    axios.get('http://localhost:5000/api/message')
      .then(response => {
        setMessage(response.data.message);
      })
      .catch(err => {
        setError('Failed to fetch data: ' + err.message);
        console.error(err);
      });
  }, []);

  return (
    <div>
      <h1>{error ? error : message}</h1>
    </div>
  );
}

export default App;Start the frontend with npm start. If everything’s set, you’ll see the backend message on your React page.
3. Handling CORS Errors Effectively
CORS is the gatekeeper. To fix it, update your backend’s CORS middleware:
// In backend/index.js
app.use(cors({
  origin: 'http://localhost:3000',  // Allow only your frontend origin
  methods: ['GET', 'POST', 'PUT', 'DELETE'],  // Specify allowed methods
  allowedHeaders: ['Content-Type', 'Authorization']  // For auth tokens later
}));This tells the browser it’s okay for your React app to access the backend. For production, use environment variables for origins.
Alternatively, in development, add a proxy in frontend/package.json:
"proxy": "http://localhost:5000"Now, in your Axios call, use relative URLs like /api/message—React will proxy it automatically, bypassing CORS.
4. Integrating MongoDB for Real Data Flow
To make it more practical, let’s add a POST route to save data to MongoDB. First, create a simple model in backend/models/Message.js:
const mongoose = require('mongoose');
const messageSchema = new mongoose.Schema({
  text: String,
});
module.exports = mongoose.model('Message', messageSchema);Then, add a POST endpoint in index.js:
const Message = require('./models/Message');

app.post('/api/message', async (req, res) => {
  try {
    const newMessage = new Message({ text: req.body.text });
    await newMessage.save();
    res.json({ success: true, message: 'Data saved!' });
  } catch (err) {
    res.status(500).json({ error: 'Failed to save data' });
  }
});On the frontend, add a form to send data:
// Add to App.js
const [input, setInput] = useState('');

const handleSubmit = (e) => {
  e.preventDefault();
  axios.post('http://localhost:5000/api/message', { text: input })
    .then(res => console.log(res.data.message))
    .catch(err => console.error(err));
};

return (
  <div>
    <h1>{message}</h1>
    <form onSubmit={handleSubmit}>
      <input type="text" value={input} onChange={e => setInput(e.target.value)} />
      <button type="submit">Send to Backend</button>
    </form>
  </div>
);Now, your frontend can send and receive data from MongoDB via the backend!
5. Testing and Debugging the Connection
- Run backend:
node index.js - Run frontend:
npm start - Open
http://localhost:3000and interact—send data and refresh to see updates. - Use browser dev tools (Network tab) to inspect requests and responses.
- For errors, check console logs on both sides.
Common Pitfalls and How to Avoid Them
Even with the best guide, things can go wrong. Here’s what I’ve learned from real projects:
- CORS Misconfiguration: Always specify origins in production. Test with tools like Postman.
- Incorrect API Endpoints: Typos in URLs are sneaky—use environment variables (e.g., via dotenv) for flexibility.
- Server or Database Not Running: Forgot to start MongoDB? Use
mongodin a terminal. - Handling Asynchronous Code: Use async/await in backend for cleaner error handling.
- Security Oversights: In production, add authentication (JWT) to protect routes.
Pro Tip: Log everything during development with console.log or a tool like Winston.
📌 FAQs on Connecting Frontend and Backend in MERN Stack
Q1: Axios vs. Fetch API—Which is Better for MERN?
Both are great, but Axios shines with interceptors for auth tokens and automatic JSON transformation. Fetch is built-in but requires more boilerplate for errors.
Q2: How Do I Use a Proxy in React to Avoid CORS?
Add "proxy": "http://localhost:5000" to your package.json. Then, call APIs relatively (e.g., axios.get('/api/message')).
Q3: What About Deployment? Does This Work on Hosting Platforms?
Absolutely! Deploy backend to Heroku/Render and frontend to Vercel/Netlify. Use environment variables for URLs, and serve both under one domain to eliminate CORS.
Q4: Can I Connect Multiple Frontends to One Backend?
Yes, just configure CORS to allow multiple origins or use a wildcard (but be cautious for security).
Q5: How Do I Handle Errors Gracefully in Production?
Implement global error handlers in Express and use try-catch in React. Display user-friendly messages instead of raw errors.
Conclusion: Master MERN Connections and Build Amazing Apps
Congratulations—you’ve just learned how to connect frontend with backend in MERN stack in a practical, hands-on way! From setting up servers to integrating MongoDB and squashing CORS bugs, this foundation will power your next project, be it a personal portfolio, a chat app, or a full-fledged SaaS tool.
Remember, practice makes perfect. Start small, iterate, and soon you’ll be adding advanced features like real-time updates with Socket.io or secure auth with JWT.
Ready to level up? Check out my in-depth tutorial on MERN Authentication Best Practices next. And if you found this helpful, share it with a fellow dev!